JavaScript设计模式-结构型-桥接模式
概要
桥接模式是一种结构型设计模式, 可将一个大类或一系列紧密相关的类拆分为抽象和实现两个独立的层次结构,使它们都可以独立的变化, 从而能在开发时分别使用。
问题
我们有一个几何 形状Shape类, 从它能扩展出两个子类: 圆形Circle和 方形Square 。
/**
 * 抽象形状类
 */
class Shape {
  draw() {
    throw new Error('draw 方法没有实现!')
  }
}

/**
 * 形状圆类 继承形状类
 */
class Circle extends Shape {
  constructor(radius) {
    super()
    this.radius = radius
  }

  draw() {
    console.log('渲染半径为' + this.radius + '的圆形')
  }
}

/**
 * 形状正方形类 继承形状类
 */
class Square extends Shape {
  constructor(width) {
    super()
    this.width = width
  }

  draw() {
    console.log('渲染边长为' + this.width + '的正方形')
  }
}
随着需求的变化要对这样的类层次结构进行扩展以使其包含颜色, 所以你打算创建名为 红色Red和 蓝色Blue的形状子类。 但是, 由于你已有两个子类, 所以总共需要创建四个类才能覆盖所有组合, 例如 蓝色圆形BlueCircle和 红色方形RedSquare 。
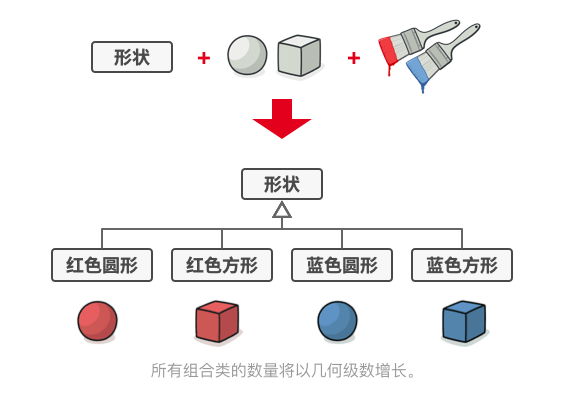
在层次结构中新增形状和颜色将导致代码复杂程度指数增长。 例如添加三角形状, 你需要新增两个子类, 也就是每种颜色一个; 此后新增一种新颜色需要新增三个子类, 即每种形状一个。 如此以往, 情况会越来越糟糕。
解决方案
根本原因在于我们试图在两个独立的维度——形状与颜色——上扩展形状类。 这在处理类继承时是很常见的问题。
桥接模式通过将继承改为组合的方式来解决这个问题。 具体来说, 就是抽取其中一个维度并使之成为独立的类层次, 这样就可以在初始类中引用这个新层次的对象, 从而使得一个类不必拥有所有的状态和行为。
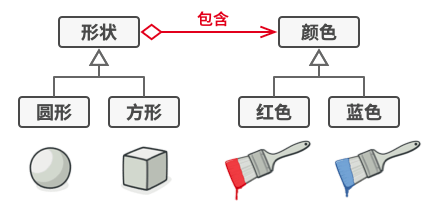
我们可以将颜色相关的代码抽取到拥有 红色和 蓝色两个子类的颜色类中, 然后在 形状类中添加一个指向某一颜色对象的引用成员变量。 现在, 形状类可以将所有与颜色相关的工作委派给连入的颜色对象。 这样的引用就成为了 形状和 颜色之间的桥梁。 此后, 新增颜色将不再需要修改形状的类层次, 反之亦然。
抽象部分和实现部分的疑惑?
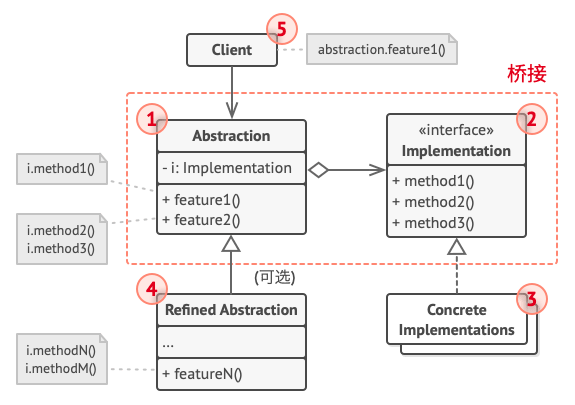
抽象部分 (也被称为接口) 是一些实体的高阶控制层。 该层自身不完成任何具体的工作, 它需要将工作委派给实现部分层 (也被称为平台)
适配器模式结构图
-
抽象部分 (Abstraction) 提供高层控制逻辑, 依赖于完成底层实际工作的实现对象。
-
实现部分 (Implementation) 为所有具体实现声明通用接口。 抽象部分仅能通过在这里声明的方法与实现对象交互。
抽象部分可以列出和实现部分一样的方法, 但是抽象部分通常声明一些复杂行为, 这些行为依赖于多种由实现部分声明的原语操作。
-
具体实现 (Concrete Implementations) 中包括特定于平台的代码。
-
精确抽象 (Refined Abstraction) 提供控制逻辑的变体。 与其父类一样, 它们通过通用实现接口与不同的实现进行交互。
-
通常情况下, 客户端 (Client) 仅关心如何与抽象部分合作。 但是, 客户端需要将抽象对象与一个实现对象连接起来。
举例
案例一,为几何体着色
/**
 * Abstraction control
 * 形状类
 * “抽象部分”定义了两个类层次结构中“控制”部分的接口。它管理着一个指向“实
 * 现部分”层次结构中对象的引用,并会将所有真实工作委派给该对象。
 */
class ShapeControl {
  constructor(paintColor) {
    this.paintColor = paintColor
  }

  draw() {
    throw new Error('draw 方法没有实现!')
  }
}

/**
 * Extended Abstraction
 * 形状圆类 继承形状类
 * 可以扩展抽象而不改变实现类
 */
class CircleShapeControl extends ShapeControl {
  constructor(paintColor) {
    super(paintColor)
    this.radius = 10
  }

  draw() {
    return '渲染半径为' + this.radius + (this.paintColor.getColor ? ',颜色为' + this.paintColor.getColor() : '') + '的圆形'
  }
}

/**
 * Extended Abstraction
 * 形状正方形类 继承形状类
 * 可以扩展抽象而不改变实现类
 */
class SquareShapeControl extends ShapeControl {
  constructor(paintColor) {
    super(paintColor)
    this.width = 10
  }

  draw() {
    return '渲染边长为' + this.width + (this.paintColor.getColor ? ',颜色为' + this.paintColor.getColor() : '') + '的正方形'
  }
}

/**
 * Implementation platform
 * “实现部分”接口声明了在所有具体实现类中通用的方法。它不需要与抽象接口相
 * 匹配。实际上,这两个接口可以完全不一样。通常实现接口只提供原语操作,而
 * 抽象接口则会基于这些操作定义较高层次的操作。
 */
class PaintColor {
  getColor() {
    throw new Error('getColor 方法没有实现!')
  }
}

/**
 * Concrete Implementation
 * 每个具体实现对应一个特定的平台和
 * 使用该平台的 API。
 * 着色红
 */
class PaintColorRed extends PaintColor {
  constructor() {
    super()
    this.color = 'red'
  }

  getColor() {
    return this.color
  }
}

/**
 * Concrete Implementation
 * 每个具体实现对应一个特定的平台和
 * 使用该平台的 API。
 * 着色蓝
 */
class PaintColorBlue extends PaintColor {
  constructor() {
    super()
    this.color = 'blue'
  }

  getColor() {
    return this.color
  }
}

function clientCode(abstraction) {
  console.log(abstraction.draw())
}

const circlePaintRed = new CircleShapeControl(new PaintColorRed())
clientCode(circlePaintRed)

console.log('')

const squarePaintBlue = new SquareShapeControl(new PaintColorBlue())
clientCode(squarePaintBlue)
output
"渲染半径为10,颜色为red的圆形"
""
"渲染边长为10,颜色为blue的正方形"
案例二,nodejs是如何在不同系统运行的?
Node 在实现跨平台处理异步I/O时,由于不同系统的局限性,在处理异步I/O用到的技术方案是不同的。
Node使用libuv作为抽象封装层,让不同平台差异调度兼容。
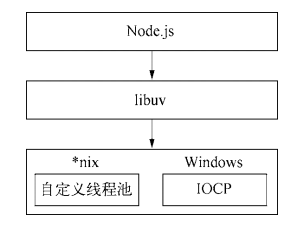
在创建跨平台应用程序我们可以使用桥接模式,Node用libuv抽象类判断系统的不同来使用哪个具体实现异步I/O类。
随着时间的推移,Node版本也会越来越多libuv抽象类也会有不同的版本,这个一个版本的维度。 未来系统也会增加,我们都可以要面临适配的需求。
我们可以把Node用libuv处理多平台异步I/O分出两个维度
- 抽象部分: 程序的 libuv 层,会随着版本不同变化。
- 实现部分: 操作系统的 异步I/O API实现,会有更多不同的系统加入。
下面我们利用桥接模式,写些伪代码来简单还原Node跨平台处理异步I/O是什么样子的。
/**
 * 抽象
 */
class Libuv {
  constructor(system) {
    this.system = system
  }

  readFile(fpath) {
    return this.system.readFileStream(fpath)
  }

  readFileAsync(fpath) {
    return this.system.readFileAsyncStream(fpath)
  }
}

class LibuvV1 extends Libuv {
  constructor(system) {
    super(system)
  }

  readFile(fpath) {
    // 版本升级,计算逻辑改动
    return this.system.readFileStream(fpath)
  }

  readFileAsync(fpath, encoding) {
    // 版本升级,计算逻辑改动
    return this.system.readFileAsyncStream(fpath)
  }
}

/**
 * 具体
 */
class System {
  readFileStream(path) {
    return 'read file finish.'
  }
}

class WindowsSystem extends System {
  constructor() {
    super()
  }
  readFileAsyncStream(path) {
    // 平台机制不同,实现异步逻辑
    return 'Window async read file finish.'
  }
}

class LinuxSystem extends System {
  constructor() {
    super()
  }
  readFileAsyncStream(path) {
    // 平台机制不同,实现异步逻辑
    return 'Linux async read file finish.'
  }
}

// node 基础版本在 Windows 系统桥接使用
const libuvWindows = new Libuv(new WindowsSystem())
const readFileWindowsResult = libuvWindows.readFileAsync('./a.text')
console.log(readFileWindowsResult)

// node V1版本在 Linux 系统桥接使用
const libuvLinux = new LibuvV1(new LinuxSystem())
const readFileLinuxResult = libuvLinux.readFileAsync('./a.text')
console.log(readFileLinuxResult)
output
"Window async read file finish."
"Linux async read file finish."
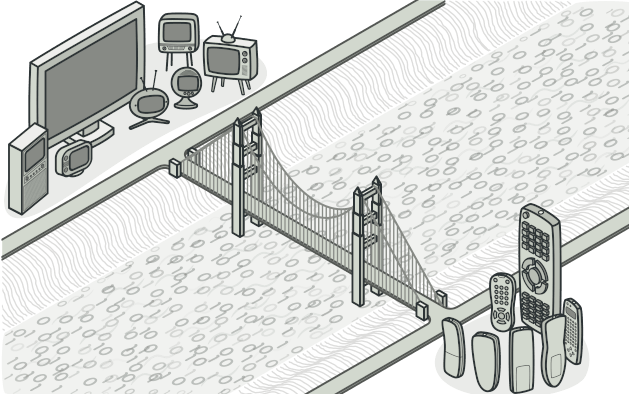
案例三,遥控器桥接电器设备使用
我们都知道电器可以配合着遥控器使用,那么他们是如何连接工作的呢?
首先电器设备会提供各式各样的功能,然后遥控器的按键一一对应这些功能去做调用,当用户点击遥控器按键,就能触发电器设备的功能。
这样我们的遥控器可以适配很多的电器,他们之间做好桥接就可以了。

/**
 * 抽象遥控器 control
 */
class RemoteControl {

  constructor(device) {
    this.device = device
  }

  togglePower() {
    if (this.device.isEnabled()) {
      this.device.disable()
    } else {
      this.device.enable()
    }
  }

  volumeDown() {
    this.device.setVolume(this.device.getVolume() - 10)
  }

  volumeUp() {
    this.device.setVolume(this.device.getVolume() + 10)
  }

  channelDown() {
    this.device.setChannel(this.device.getChannel() - 1)
  }

  channelUp() {
    this.device.setChannel(this.device.getChannel() + 1)
  }
}

/**
 * 精准遥控器,比如可以静音的遥控器
 */
class AdvancedRemoteControl extends RemoteControl {
  constructor(device) {
    super(device)
  }

  mute() {
    this.device.setVolume(0)
  }
}


/**
 * 实现部分 platform
 */
class Device {

  constructor() {
    this.volume = 30
    this.channel = 1
    this.playing = false
  }

  isEnabled() {
    return this.playing
  }

  enable() {
    this.playing = true
  }

  disable() {
    this.playing = false
  }

  getVolume() {
    return this.volume
  }

  setVolume(percent) {
    this.volume = percent
  }

  getChannel() {
    return this.channel
  }

  setChannel(channel) {
    this.channel = channel
  }

}

/**
 *  具体实现,电视机
 */
class Tv extends Device {
  constructor() {
    super()
  }
}

/**
 * 具体实现,收音机
 */
class Radio extends Device {
  constructor() {
    super()
  }
}

// 客户端
// 客户端与具体抽象合作,但需要将具体抽象与一个具体实现对象链接起来

// 让电视和遥控器桥接起来使用
const tv = new Tv()
const tvRemote = new RemoteControl(tv)
// 点击遥控器开关机
tvRemote.togglePower()
// 查看电视开机状态
console.log(tvRemote.device.isEnabled())

// 让收音机和遥控器桥接起来使用
const radio = new Radio()
const radioRemote = new AdvancedRemoteControl(radio)
// 点击遥控器开关机
radioRemote.togglePower()
// 查看收音机开机状态
console.log(radioRemote.device.isEnabled())
output
true
true
总结
优缺点
- 优点
- 开闭原则。 你可以新增抽象部分和实现部分, 且它们之间不会相互影响。桥接模式提高的系统的可扩展性,对变化的维度进行扩展,而不需要修改原有的系统。
- 单一职责原则。 抽象部分专注于处理高层逻辑, 实现部分处理平台细节。
- 缺点
- 对高内聚的类使用该模式可能会让代码更加复杂。
适合应用场景
- 如果产品的部件有独立的变化维度,可以考虑桥接模式
- 不希望使用继承,或因为多层次继承导致系统类的个数急剧增加的系统
- 产品部件的粒度越细,部件复用的必要性越大,可以考虑桥接模式